Search DIY Car Repair

Wednesday, September 14, 2011

Winterizing: The Basics

Some of us may have taken advantage of the great deals on new cars this season to indulge in a guilty pleasure: the summer vehicle.  My Mercedes is a summer-only vehicle that will never be driven in the harsh Michigan winter.  I wish to keep it looking nice and in good shape.  We all know what these cost to fix!

For all of you that are new to the two-car lifestyle, here are some helpful hints and procedures to keep your car in good shape while hibernating for the winter.

Storing a vehicle for a long time is like committing murder
against your vehicle.  Paint fades, tires flatten, rubber dries.
Cars, like most other machines, function better when used periodically.  Simply sitting in one spot for years and years can yield a multitude of problems for a car, like engine seizure and suspension wear.  If stored unprotected and unprepared outside, a vehicle is prone to rust and corrosion from the moisture and temperature changes.  Rubber seals dry out and oil starts leaking.  Tires become dry and misshapen from sun and sitting.  Paint fades.  Sitting outside unprepared is horrible for a vehicle.  As an example, my grandmother has the same vehicle pictured to the right, a 1986 Dodge 600 convertible.  It is a fairly rare example of a vehicle, with only 14,000 produced (and hers, being triple white and turbo, had a 4200 production run) and should be cared for with the greatest respect, unlike this example.  While most people only saw it as a Chrysler K-Body convertible, she saw a vision of an up-and-coming classic that would serve to provide people with a sense of the past.  The care of this automobile has been immaculate, and it definitely shows.  The paint shines like new, the convertible top is flexible and not torn, and it runs and drives like a new car.  It has been cared for with respect.  This is due to diligent procedures when storing for the winter.

When preparing to store your vehicle for the winter, remember that inside storage is always the best if available.  The outside elements will take their toll on your car, sometimes more than simply driving it.  The first thing to do is to select a dry storage facility where your vehicle can hibernate in peace for the winter months.  Even if it is inside, you will still want to cover it, so purchase a good quality car cover that fits your car correctly and covers everything.

Here are some basic steps:

1.  Stabilize the fuel.
     Gasoline is a light petroleum product infused with alcohol.  As we all know, if we leave rubbing alcohol open, it will eventually evaporate and only water will be left, then the water evaporates and there is nothing but debris from the minerals in the water used to manufacture the alcohol.  The same holds true for gasoline.  When the alcohol evaporates from gasoline, it is not combustible in a gasoline engine any more and you will end up with a potentially expensive problem on your hands.  Products such as Sta-Bil will help to stabilize the alcohol in the gasoline to keep it fresher longer.  Always follow the directions on the label when adding fuel treatments-more does not do any better.  After adding the fuel stabilizer, run your vehicle to operating temperature to ensure that all of the previous pure fuel is purged from the pipes and hoses, all the way through to the fuel injectors.

2.  Test the coolant
     Be sure to test the coolant for effectiveness.  Your antifreeze will become less potent over time and can actually become so cold that it will freeze.  Freezing water in an engine will expand through cooling ports and actually break iron, so your engine block can be in trouble if the antifreeze is not up to snuff.  If it is not effective to at least -20 Fahrenheit, then flush the system and refill with a 50/50 blend of antifreeze and distilled water.

3.  Grease and oil.
     You don't want old oil sitting in your engine for an extended period of time.  Granted, oil does not lose viscosity over time by sitting, but it will become corrosive from the chemical byproducts of combustion.  This corrosive nature will eat away at aluminum, copper, and iron engine components over time.  Change the oil before storage.  Be sure to lubricate all chassis points as well.  Sometimes, water infiltration can freeze in suspension components and will expand just like bad antifreeze in an engine block, causing premature failure of components.  By greasing the lubrication points, the water is forced out and replaced with grease to keep everything fresh and healthy.  While you're under the car greasing and changing the oil, grab your trusty can of WD-40 and go to town spraying it on the underside of the car.  Spray in the small holes in the unibody or frame, on the exhaust components (after they cool), and inside of the door sills.  WD-40 is actually a water displacing agent, so it will seal and prevent water from infiltrating the steel components and it will prevent rust and corrosion.

4.  Find it a home and put it on stands.
     Suspension components, although not being worn from use, will become worn if sitting with constant weight on them for an extended period of time.  By removing the weight from the springs and pivot points, they will remain fresher longer.  Jack the vehicle up with a good hydraulic jack near the center of the front or the center of either side.  Make sure both wheels are level, and place jack stands under the frame or unibody with a few oil-soaked rags to insulate between the jack and the frame.  By soaking the rag in oil, you will prevent water infiltration and protect the vehicle from scratches caused by direct metal-on-metal contact.

5.  Open the hood and leave it open.
     Critters like dark places to hide and live during the winter.  Under the hood of the car is a multitude of nooks and crannies that squirrels, woodchucks, and mice would love to call home.  By opening the hood during storage, you provide less homes for these little creatures to live and hibernate.  Going back to my grandmother again, she lost a 1982 Dodge 400 convertible to a mouse nest under the hood.  My grandfather backed it out of the barn in the spring and it engulfed in to flames, burning to the ground.  Be sure to inspect it in the spring for nests and debris that could be flammable!

6.  Remove the battery
     Batteries contain water, which can freeze during the cold months.  When water freezes, we all know what happens: it expands and has the power to break iron.  Batteries are no different, but they are made of plastic. They will certainly rupture and leak acid on to the underside of the car if frozen.  Watch this video to see what happens with only a 32% concentration of hydrochloric acid reacting with steel wool:
http://www.youtube.com/watch?v=lSmcwzTF_6Y
The reaction is similar to what will happen when sulfuric acid reacts with the steel under the battery tray.  Remove the battery and put it in the house somewhere warm.  Contrary to popular myth, the battery will not discharge if stored on concrete.  However, some batteries have traces of sulfuric acid on their bodies, so you'll want to store it on a piece of scrap wood for the winter.

7.  Kiss it goodnight, seal it, and cover it up.
     It is important to close all of the windows to keep debris out.  You don't want to come back to a dirty and dusty car, so close it up tight.  This also prevents moisture from infiltrating your interior and causing musty smells and mold.  When covering it, be sure to cover all of it, including the tires.  Any part of the car exposed will collect dust and moisture which acts like sandpaper on the paint.  Never cover it with a cheap tarp, as the plastic material will not allow the moisture to escape.  You will want a good quality car cover that can breathe and keep the dust off.

Storing your vehicle properly is the key to having a true
classic to enjoy in the summer months.
As your vehicle is stored, visit it periodically to inspect it and start the engine.  Starting the engine will refresh the lubrication and keep it moving like it should.  I like to start mine every month.  When starting it, let it idle to operating temperature.  The oil you sprayed on the exhaust components will burn off, causing a bit of smoke.  This is nothing to worry about, though.  It will not catch fire.  Be sure to remove the battery and re-spray the exhaust components with WD-40 after it cools.  Follow these tips to keep your car looking and working like new, and you will have a true classic for years to come!

For any questions about storing your vehicle for the winter, repairing your vehicle, or automotive questions in general email me at DIYfixyourcar@gmail.com

Fuel consumption and fast food

Look at America today.  We are a society that is hungry for fuel and hungry for food on the go.  Many places that we patronize for our food needs hold the key to a symbiotic relationship with the automobile.

We love our French fries, our cheese sticks, and our other deep-fried foods.  The oil that is used in the fryers goes to profit the fast food companies, the oil suppliers, the corn growers, and the economy in general.  What happens when that oil's life is ended and it is no longer safe for cooking?  It goes to a tank outside of the restaurant to be sold off to a recycler and never to be used for anything very useful again.  I was thinking about this the other night while researching some of the newer economical diesel engines on the market in Europe and had a great thought.

Why not use the oil to power our need for the automobile?

Let's take a look at how a diesel engine works, first.  Basically, your normal gasoline engine needs three things to run-air, fuel, and ignition.  Without one of these, the car will not run.  Air is taken in through the intake and pulled to the cylinder, mixing with a spray of fuel atomized by a fuel injector.  A valve closes, sealing the cylinder.  A piston compresses the fuel and air mixture, and at just the right point, a spark plug ignites the volatile mixture to cause an explosion, sending the piston downward to turn a crankshaft.  If all things are timed just right, the fuel and air mixture is just right, and the cylinder is sealed tightly, the engine runs fine with no problems.  A gasoline engine requires fuel that is rich in explosive alcohol, or octane.  It is mixed with a light oil to lubricate internal components.  When compressed, this mixture is highly explosive.

A diesel engine only uses the power of air compression to ignite fuel.  It works off of the same basic principles, save the electronic spark to ignite the fuel.  Air is taken in through the intake and placed directly in to the cylinder through an intake valve.  The valve closes, the piston compresses the air, then a fuel injector atomizes a light oil directly in to the cylinder at peak compression.  The sudden compression of air causes a great amount of heat, and the light oil is atomized enough to cause an explosion.  The piston is sent down to turn the crankshaft to power the transmission, et cetera.  A diesel engine will run on any non-octane light oil as long as it is thin enough to be pushed through the system efficiently and atomized by the fuel injectors.  A diesel will run on corn oil, peanut oil, vegetable oil, olive oil, WD-40, and a multitude of other things.  This got me thinking:  light oil powers diesel engines...

As Americans, we eat a lot of fast food, which means we use a lot of corn and peanut oil to fry our favorite foods.  When this oil's useful life is up, we could use it to power diesel engines.  If the oil is filtered, it could be atomized through the injectors and cause exactly the same explosion as diesel fuel.  In fact, I have used corn oil in a diesel engine before, and it runs just fine.  How would you like to recycle and save money?  It can be possible.  In fact, the diesel engine is more efficient than a gasoline engine, lasts longer, and requires less maintenance.  You could save a ton of money by driving a diesel vehicle powered by used cooking oil, sometimes even driving for free.

Keep in mind, a diesel engine will not cold start on used vegetable oil.  The oil is too thick to be atomized cold.  It must be started and stopped on regular diesel.  Cooking oil is great if it is warm and thin, but as is cools it will thicken to the point of not being able to be atomized.  If you attempt a cooking oil conversion on your diesel vehicle, remember to leave a small tank for diesel.  A fuel cell for a race car would work great, with a fuel director switch from a dual-tank Ford pickup truck to switch between the tanks.  It may not be a bad idea to warm the vegetable oil before sending it through the system to be burned.  A simple automobile engine block heater will work great to heat the oil in the vegetable tank.

We as Americans can save money, promote the American economy, and reduce our carbon footprint by simply having enough smarts to outsmart the system.  It may not be glamorous driving a diesel vehicle, but the money saved can be great.  Even if you choose to not convert your diesel vehicle to run on vegetable oil, you're still saving money in the long run.  With the reduction in maintenance and increased fuel economy, you'll be spending a lot less money commuting to work.

For questions about diesel engines, running on vegetable oil, or anything else automotive, email me at diyfixyourcar@gmail.com

Sunday, September 11, 2011

Quick Lube Upsells

Every shop is in business to make money.  There's absolutely nothing wrong with this business model-it is the basis of business itself.  Profit is not a four-letter word.  Here's the situation:  You bring your car to the local Valvoline or Quaker State lube shop to get your oil changed like a good car owner and they try to sell you other services that usually cost a good amount of money.

One of my most frequent questions is about the upsells that shops recommend to vehicle owners that patronize their shops.  Here are a few of the examples, what you should do, the advantage and disadvantage of the service, and what it typically costs.

1.  Tire rotation
     Tire rotation is always a great idea as a maintenance item.  Typically, rotation should be performed every 6,000 miles if the tires on your vehicle all match and were purchased at the same time as a full set.  If you're the kind of person that changes the worst two (I know I am) then you will want to consider some different options.  Tire rotation actually changes seasonally.  Common sense for most people dictates that the best two tires should be on the front of the car for the best braking and steering control.  Some shops and manufacturers recommend the best pair on the rear for reduced oversteer and yaw control.  To explain deeper, yaw is the tendency of a moving object, such as a vehicle, to spin the rear end around in a circle when turning.  The weight distribution changes to the rear and one side of the vehicle in a turn, and the part of the vehicle with the increased gravitational force gains and keeps momentum more than the other sections of the car.  The increased momentum and weight acts like a counterbalance and throws the rear end of the car around, sending the vehicle in to a spin.  Just think of doing donuts...
     I recommend having the best tires on the rear of the vehicle during the summer months and the best on the front for the winter months.  Whether you're front or rear wheel drive, 70% of your braking power is on the front of the vehicle anyway.  You'll want the extra traction in the front in the slippery conditions, while you'll want the extra traction on the rear for wet conditions.  Typically this service is around $20-$30 at most shops that are equipped.  Some places will rotate your tires for free, though.  This is also a trick that gets the mechanic deeper in to your vehicle for more inspections, such as brake inspections and suspension inspections, which aren't a bad thing at all.

2.  Transmission Flush
     This can go either way.  All automatic transmissions have a light oil that makes it work.  Over time and use, this fluid becomes burned and loses viscosity.  For most vehicles, the fluid is supposed to be bright red.  If you pull your dipstick and find brown fluid that smells like bacon, then I would recommend a transmission flush.  Basically, this service replaces the transmission fluid in the vehicle through the service of it's own pump. The fluid cooler, located in the radiator or in the vicinity, has lines or hoses that connect to the main pump of the transmission.  It runs the fluid through the front of the car where fresh air can cool it to prevent burning.  One of these lines or hoses is disconnected from the vehicle and placed in to a bucket of new transmission fluid.  The other end is placed in to an empty bucket.  Typically, 16 quarts of transmission fluid is pumped through until it comes out clean at the other end.
     One of the major things to consider is the mileage and use of the vehicle.  If your fluid is still red and smells good, then it is not recommended.  Age never hurts oil...it sat in the ground for 65,000,000 years, so 10 years in a vehicle does nothing to hurt it.  If your car has over 175,000 miles on it and the fluid still looks good, then do not flush it!  Flushing a transmission with this many miles will basically "stir up the demons" and promote transmission failure.  If the service has been performed regularly throughout the vehicle's life, then by all means, have it done.
     Be sure the shop that performs the service uses the correct fluid for your vehicle as well.  Most Ford and General Motors vehicles previous to 2005 use the same fluid: DexronIII/Mercon IV.  Newer Ford vehicles take Mercon V, newer GM vehicles use Dexron IV.  These fluids have friction modifiers and are a bit thinner than the previous fluids, so the shifting points and fluid pressures will be the same.  In Chrysler vehicles, always use ATF+3 for vehicles previous to 2000, and ATF+4 for newer.  The Chrysler fluid has a distinctive smell-but that's not all.  These have special friction modifiers that save the clutches and plates, which is VERY important in a Chrysler vehicle.  NEVER run Dexron/Mercon, Type F, or any other fluid in a Chrysler vehicle.  Transmission failure will be on your horizon.
     This service can range from $75-$150, depending on the service you select.  I recommend having the best service performed in this case.  The premium service will include a filter change, special cleaners, conditioners, and a reseal of the transmission oil pan, along with the correct fluid for your car.

3.  Engine Flush.
     Pardon my redundancy with this service.  I will put a complete paragraph of what you should do in this case.
     NEVER, NEVER, NEVER, NEVER, NEVER, NEVER, NEVER, NEVER, NEVER, NEVER, NEVER, NEVER, NEVER, NEVER, NEVER, NEVER, NEVER, NEVER, NEVER, NEVER, NEVER, NEVER, NEVER, NEVER, NEVER, NEVER, NEVER, NEVER, NEVER, NEVER, NEVER, NEVER, NEVER, NEVER, NEVER, NEVER, NEVER, NEVER, NEVER, NEVER, NEVER, NEVER, NEVER, NEVER, NEVER, NEVER, NEVER, NEVER, NEVER, NEVER, NEVER, NEVER, NEVER, NEVER, NEVER, NEVER, NEVER, NEVER, NEVER, NEVER, NEVER, NEVER, NEVER, NEVER, NEVER, NEVER, EVER, EVER, EVER, EVER, EVER, EVER, EVER, EVER, EVER, EVER, EVER, EVER, EVER, EVER, EVER, EVER, EVER, EVER, EVER, EVER, EVER, EVER, EVER, EVER, EVER, EVER, EVER, EVER, EVER, EVER, EVER, EVER, get this done.
     If the shop offers you a laundry list of reasons to have an engine flush done, run fast.  This is a horrible way to treat your vehicle.  The engine flush basically washes out the carbon deposits from the lower end of your engine, right where the bearings and seals all live.  When washing away bits of carbon, oil ports and galleys can be plugged up, contaminated with both carbon and the flush agent, and the bearings will be washed out.  After an engine flush, you can typically expect your car to start leaking oil, various gasket failures including head gaskets, intake gaskets, rear main seals (which the engine/transmission has to be removed to repair) and a multitude of other things.
     This service can cost up to $150.00, but consider the going labor rate at your local garage to have your engine replaced.  Do not have this service performed, EVER!

4.  Coolant Flush
     This is a great idea.  Newer vehicles come with a long-life coolant.  Typically this coolant is red or orange in color and will last 10 years or 100k miles.  As coolant is used, the pH lowers, causing it to be corrosive.  The orange coolant, in fact, will crystallize in to small solids that will plug up your radiator and heater core.  Those of us with a history of Chevrolet S-10s will know what it's like when Dex-Cool clogs a heater core in the middle of winter.  Typically, the heater core will clog before the radiator, mostly on GM products.  I recommend having orange coolant flushed every 40-50k miles.  I, in fact, will flush the system completely with  Prestone dry cooling system flush, plenty of water, and convert the system to conventional green antifreeze.  The green stuff will not clog up the system!
     Green antifreeze should be tested at every oil change for pH and effectiveness.  You'll want the antifreeze to withstand about -30 degrees Fahrenheit with about a neutral or slightly alkaline pH.  This will ensure that your coolant will be good for the winter and not harm aluminum, brass, and copper engine components.  If the pH is too low, have it flushed.  If it is neutral and still effective, even if your vehicle has 10 million miles on it, you don't need the service performed.  This service will cost $75-$125.  You can do this at home easily as well!  All you need is antifreeze, a bucket to catch it in, and a garden hose.
     Here's an interesting fact:  Antifreeze will always be effective to cool your vehicle.  The brand, type, and age of the antifreeze has no bearing on its cooling capability.

5.  Power Steering Flush
     This is another service that is middle-of-the-road for me.  If your vehicle has dirty fluid that smells burned, then that is pretty normal.  The flushing of the steering fluid with special conditioners and additives can be a good idea, but typically it is not needed.  If you love your car and want to give it the best, then by all means, have it done.
     If your steering pump is noisy, then give it a shot!  I have seen noisy pumps clear right up with a fluid flush. All of your Ford fans (like me) have heard a noisy, buzzing steering pump a few times in your life.  Flushing the fluid will quiet this significantly.  This service will run around $75.00 at a shop, but it also can be performed at home.

6.  Brake Fluid Flush
     Totally unnecessary as a maintenance item.  Brake fluid, through normal use, will not break down.  If it becomes contaminated with oil or water, it will need to be flushed right away, though.  Heat also breaks down brake fluid.  When brake fluid is heated, it becomes thick like engine oil.  If you have a sticking caliper or a jammed pad, then it is a good idea to have this service performed.  Be forewarned, though: the bleeder valves must be opened to perform this service.  Sometimes, the bleeder valves on calipers and wheel cylinders will be rusty and break off.  Count on replacing a caliper or wheel cylinder if this happens.
     This service can run up to $100, but it can also be done at home.

Keeping your vehicle maintained is all-important to prevent further problems.  Be smart about your maintenance and never buy anything you're leery of right away.  If your car runs fine, then sleep on it and ask questions about the service.  I get a lot of calls about which services to have done to a vehicle, and some of them are outright rubbish.  All of these services can be performed at home with minimal tools, though.  All you will have in to these projects is some time and materials.  Doing it yourself always saves money!  For questions about repairs and vehicle maintenance, or for steps to perform maintenance repairs, email me at DIYfixyourcar@gmail.com
Monday, September 5, 2011

Maintaining Resale Value

One of the things we hardly consider when making the choice to purchase a vehicle is what it will be worth when we are done with it.  Some of us are gifted in the vehicle resale field, but for a majority of us, reselling a vehicle yields a loss of money that can't be avoided.  Don't fret about it; losing money on a vehicle is a part of life.  The useful value of a car is outweighed by the loss of money that we experience when it is time to say goodbye.

Lessening the blow in the end is something that we can control, however.  Here are some tips that can earn you some extra money when it is time to sell.

1.  Keep it clean
     Keeping our vehicles clean can be a challenge sometimes.  Between commuting to work, school, daycare, getting groceries, and weekend cruising, our vehicles suffer from neglect from the daily grind.  Coffee cups, food bags, cigarette ashes, and dirty glass can adorn some of our vehicles.  Working in automotive salvage throughout the years I have bought several vehicles that were simply too dirty to sell.  They ran fine, but the cost to restore their interiors to a livable state would have far exceeded the value of the vehicle.
     Remember to keep your car clean and smelling good.  If you spill coffee on the carpet, it will clean up with just some regular automotive cleaners.  I recommend Simple Green.  Automotive carpet is nothing like house carpet.  If you spill red wine on automotive carpet, it will not stain like in the house.  Automotive carpet is made from polyester fibres and are not prone to staining from soaking and wicking.  A little maintenance goes a long way in this case.  As a smoker, I often light up in my car.  It's inevitable that ashes will make their way in to the carpet and seats, but a weekly vacuuming take care of that problem and keep my car smelling and looking new.

2.  Keep it maintained.
     Maintaining a vehicle is a small investment that can go a long way.  Aside from making your vehicle more reliable in the short run, it will keep it worth more in the long run.  When you buy a new vehicle, you'd like to see all of the maintenance records, right?  Keep your receipts to prove that maintenance has been performed. Even if you maintain your vehicle yourself, keep the receipts for the parts and record the mileage on the receipt at the time of maintenance.  This goes a long way for the savvy buyer.  He or she will know that they are getting the best deal on the car and that will, in turn, get you more money in the sale.
     Don't forget to fix things that break.  Maybe you can deal with that broken armrest or unbalanced tire, but the next person will seize that opportunity to lower the price so they can have the best deal possible.  You want to give the buyer the best deal possible while knowing that you're selling them a car that is free of defects and you can be proud that you've sold them a reliable, well maintained vehicle.

3.  Timing is everything
     Fuel prices are at an all-time high.  Here in Michigan, we have winters that are harsh on commuters and on cars.  Don't try to sell your 4x4 Chevy truck in the middle of summer because people will find this as an opportunity to buy it for rock-bottom pricing.  All it is worth in summer is the 12mpg.  In winter, however, it is worth the safety of 4x4.  You wouldn't try to sell your motorcycle in February, would you?
     Sell your vehicle in the appropriate season.  Trucks for winter, convertibles for summer, and always showcase the best trait for the season.  In August, when selling your Taurus, showcase that the A/C is cold as ice.  In January, showcase the front wheel drive and boiling hot heat.  People love to see the good in vehicles.

4.  Keep it simple.
     Aftermarket accessories will actually hinder many people from buying a vehicle.  Some are fine, such as a lift kit and roll bar on a nice 4x4 truck, but for the most part, people don't desire a bunch of personality.  Body kits, xenon lights, aftermarket taillights, and loud pipes on your Acura Integra might be fine for you, but for the next owner they might not be exactly what they want.  It's like selling your house painted lime green.  If you can find that right buyer it is okay, but for the majority of the population, they will prefer something more neutral that they can modify and personalize themselves.
     Keep your car stock and clean looking for the sale.  If you have already modified it, then there's not much that you can do about it at this time other than disclose the modifications and hope for the best.  Simple and stock always wins the car race.

Selling a car can be stressful, but the rewards are great if the vehicle is well maintained, clean, and known reliable.  As I have stressed before, when purchasing your new car, always check the value of it as to not get the shaft.  Edmunds.com and Caranddriver.com offer information about projected resale value of vehicles.  As a rule, imported cars hold value better than domestics, although some domestics hold their value better than others, while some imports tank over time.  Steer toward Honda, Toyota, Volvo, Nissan, BMW, and Volkswagen for the highest resale value.  Ford, Mazda, and General Motors vehicles are about average in projected resale, but steer away from Chrysler, Kia, Isuzu, and Mercedes-Benz for resale.  Depreciation is ungodly rapid on these.  If you like the car, then don't let resale bother you.  If you plan on keeping it for a couple of years and offing it, then consider projected resale when making a decision to buy.

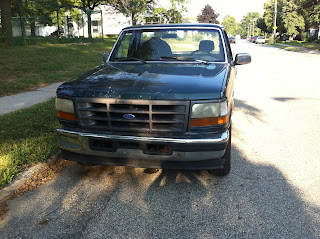
As an example, in the last six years, my 2005 Mercedes-Benz C230 Kompressor has lost over $30,000 of value, while my 1993 Ford F-150 has only lost $8,000 in the last 18 years.

For any questions about reselling a vehicle, vehicle repair questions, or questions about cars in general, feel free to email me at DIYfixyourcar@gmail.com
Thursday, September 1, 2011

Repair: 1993 Ford F-150 Starter Motor

After not starting at Menard's, Gene needs a starter repair.


My trusty old Ford pickup failed me at Menard's a couple of weeks ago.  I was in the lumber yard gathering some wood for a home project, I loaded the wood in to the back, went to start the truck, and got only a clicking noise.  Oh no!  My truck won't start!  Luckily, it is a manual transmission and I had battery power, so I rolled it fast enough to engage the clutch and start the engine to drive it home.  No AAA for me this time!  I had a few minutes today, so I decided to get out and fix it.  Let's see what happened!

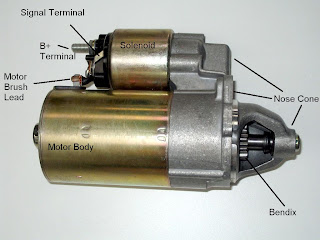
First, let's explore some of the various components of a starter.  Every starter has a motor body, Bendix, and nose cone.  Most have a solenoid attached.
Components of a starter.  Click for a larger image.
The solenoid is an electromagnetic switch that is basically a relay.  When you turn the key, a wire sends signal to the signal terminal of the solenoid that activates an electromagnet, drawing terminals of a larger switch together.  This is what makes contact to power the starter.  Not only does the solenoid act as a relay, but it is also a mechanical actuator for the Bendix.  When the solenoid is drawn in, it pulls back a fork or plunger attached to the drive gear.  This fulcrum is called the Bendix.  The Bendix also has the drive gear attached.  The drive gear will mesh with the flywheel and turn the engine.  After the motor stops running, the drive gear is pulled back away by spring compression when the solenoid is de-energized.

The nose cone acts as a support for the main shaft of the armature of the starter.  It is machined to close tolerances so it will not contact the flywheel or cause the drive gear to not contact the flywheel gear.  If the nose cone is broken, the starter will make a HORRIBLE sound and will eventually stop working.  The nose cone is where the starter is mounted to the vehicle.

The motor body houses the commutator, armature, brushes, and planetary gears.  It is basically an electric motor.  Nothing exciting there.

To begin the repair, I bench tested the brand-used starter I got from the salvage yard.  When buying used parts for your vehicle, it is of the utmost importance to test the parts that are bench testable before proceeding with any repairs.  Starters, alternators, coils, and pretty much anything electrical is testable out of the vehicle.  We wouldn't want to go through possible hours of labor to install a bad part!

To bench test a starter, simply find your jumper cables in the garage and connect them to the starter as illustrated here:
To bench test, connect the leads of the jumper cables as shown.  Negative goes to the body of the starter (usually a mounting hole works good) while the positive side is clamped to both the signal terminal (small post) and the B+ terminal (large post at the top)
Connect the opposite positive clamp of the jumper cables to the battery positive.  The negative clamp will be your manual switch in this case.  Tap the end of the negative jumper cable to the negative post of the battery.  If everything functions correctly, you should then hear a loud, audible 'click' and the motor should start running freely.  In the case of this starter, the motor sounded labored and loud.  I had gotten a bad part from the salvage yard!  No worries...I fixed it anyway.  We'll go through how that worked.

Time to pull the starter out of the truck.  Locate the negative battery terminal on the battery, loosen it, and remove it from the area of the post.  This will ensure that all power is disconnected from the electrical system of the truck.  The starter wire is constantly powered and there is no switch, so you must disconnect power directly from the battery to make a safe working environment under the vehicle.  If this is not done, the battery could short to ground by touching the terminal of the starter to the frame of the vehicle or other components that may be in the way under the truck.

Locate the starter.  Usually, it is located on the bottom of the engine, bolted toward the transmission.  Some GM products have the starter bolted the other way, directly to the engine block.  It depends on the manufacturer.  Some vehicles, such as a Cadillac DeVille with the Northstar V8, require the entire upper half of the engine to be removed to gain access to the starter.  They're not fun.  Fortunately, this is an old 4.9 (300cid) inline 6-cylinder with a stick transmission.  There's an entire ballroom to work with under there.
Find the starter motor under the vehicle bolted to the transmission.
Remove the bolts that hold the starter in place.  On this particular vehicle, there are only two.  Some have up to four.  be careful to remove all of them, as trying to pry or force the starter out could cause catastrophic transmission damage.  Once the starter is hanging by the power lead (that will not hurt it) then remove the nut for the solenoid signal terminal.  As you will remember, the signal terminal is the smaller of the two that have wires on them.  Next, remove the nut for the B+ terminal (the larger one).  After that is all said and done, your starter is in your hand and ready to be bench tested like the other one.

After bench testing this starter, I found that the solenoid had an open circuit when activated.  A multitude of things could cause this, but the solenoid in a Ford is not serviceable, only replaceable.  To test for a bad solenoid, connect and bench test the starter as before.  If a loud 'click' is heard and nothing happens with the motor, there could be a problem with the motor as well.  If no 'click' is heard, the solenoid is likely bad and can be replaced with good success.  This was a sneaky little devil, so I had to test the motor itself.  On the bottom of the solenoid you will see a terminal that has a braided cable connected to it that leads in to the body of the starter motor.  This is the power lead for the brushes.  We are going to power this terminal directly without the help of the solenoid.

After connecting the cables to the starter and the battery, I found that this starter runs like brand-new...quiet as ever.  The solenoid happens to be bad, though.

I removed the solenoid from one starter and replaced it on to the other one.  This can be achieved by simply removing the power lead to the brushes and the retainer bolts.  It simply slides right out.  After bolting the new solenoid on to my old starter, I am confident that my Frankenstein of a starter will work as designed without a trip back to the salvage yard to exchange the bad one.

Removing the solenoid is no hard task.  Simply remove the wire terminal nut and retainer bolts.  Installation is a reverse of removal.
Bench test the starter again to ensure proper operation.  In this case, the starter works great!  It clicked like it was supposed to, the motor ran quiet, and the Bendix operated perfectly.

Installing the starter back in to the truck is a reverse of removal.  Connect the B+ lead, then the signal lead, then bolt it in to place.  Be sure the wires are far away from hot exhaust components, as this could melt through the insulation and cause a fire.  Don't try to be He-Man with the bolts, either.  Tighten them up tight, but not super tight.  If a hole becomes stripped, that is a difficult problem to solve.

I put the starter back in the truck and it started right up!  My trusty pickup lives again!
Enjoy your dirty-handed test drive.
For any questions about automotive repair or components, feel free to email me at DIYfixyourcar@gmail.com.