Search DIY Car Repair

Showing posts with label car repair. Show all posts

Sunday, September 11, 2011

Quick Lube Upsells

Every shop is in business to make money.  There's absolutely nothing wrong with this business model-it is the basis of business itself.  Profit is not a four-letter word.  Here's the situation:  You bring your car to the local Valvoline or Quaker State lube shop to get your oil changed like a good car owner and they try to sell you other services that usually cost a good amount of money.

One of my most frequent questions is about the upsells that shops recommend to vehicle owners that patronize their shops.  Here are a few of the examples, what you should do, the advantage and disadvantage of the service, and what it typically costs.

1.  Tire rotation
     Tire rotation is always a great idea as a maintenance item.  Typically, rotation should be performed every 6,000 miles if the tires on your vehicle all match and were purchased at the same time as a full set.  If you're the kind of person that changes the worst two (I know I am) then you will want to consider some different options.  Tire rotation actually changes seasonally.  Common sense for most people dictates that the best two tires should be on the front of the car for the best braking and steering control.  Some shops and manufacturers recommend the best pair on the rear for reduced oversteer and yaw control.  To explain deeper, yaw is the tendency of a moving object, such as a vehicle, to spin the rear end around in a circle when turning.  The weight distribution changes to the rear and one side of the vehicle in a turn, and the part of the vehicle with the increased gravitational force gains and keeps momentum more than the other sections of the car.  The increased momentum and weight acts like a counterbalance and throws the rear end of the car around, sending the vehicle in to a spin.  Just think of doing donuts...
     I recommend having the best tires on the rear of the vehicle during the summer months and the best on the front for the winter months.  Whether you're front or rear wheel drive, 70% of your braking power is on the front of the vehicle anyway.  You'll want the extra traction in the front in the slippery conditions, while you'll want the extra traction on the rear for wet conditions.  Typically this service is around $20-$30 at most shops that are equipped.  Some places will rotate your tires for free, though.  This is also a trick that gets the mechanic deeper in to your vehicle for more inspections, such as brake inspections and suspension inspections, which aren't a bad thing at all.

2.  Transmission Flush
     This can go either way.  All automatic transmissions have a light oil that makes it work.  Over time and use, this fluid becomes burned and loses viscosity.  For most vehicles, the fluid is supposed to be bright red.  If you pull your dipstick and find brown fluid that smells like bacon, then I would recommend a transmission flush.  Basically, this service replaces the transmission fluid in the vehicle through the service of it's own pump. The fluid cooler, located in the radiator or in the vicinity, has lines or hoses that connect to the main pump of the transmission.  It runs the fluid through the front of the car where fresh air can cool it to prevent burning.  One of these lines or hoses is disconnected from the vehicle and placed in to a bucket of new transmission fluid.  The other end is placed in to an empty bucket.  Typically, 16 quarts of transmission fluid is pumped through until it comes out clean at the other end.
     One of the major things to consider is the mileage and use of the vehicle.  If your fluid is still red and smells good, then it is not recommended.  Age never hurts oil...it sat in the ground for 65,000,000 years, so 10 years in a vehicle does nothing to hurt it.  If your car has over 175,000 miles on it and the fluid still looks good, then do not flush it!  Flushing a transmission with this many miles will basically "stir up the demons" and promote transmission failure.  If the service has been performed regularly throughout the vehicle's life, then by all means, have it done.
     Be sure the shop that performs the service uses the correct fluid for your vehicle as well.  Most Ford and General Motors vehicles previous to 2005 use the same fluid: DexronIII/Mercon IV.  Newer Ford vehicles take Mercon V, newer GM vehicles use Dexron IV.  These fluids have friction modifiers and are a bit thinner than the previous fluids, so the shifting points and fluid pressures will be the same.  In Chrysler vehicles, always use ATF+3 for vehicles previous to 2000, and ATF+4 for newer.  The Chrysler fluid has a distinctive smell-but that's not all.  These have special friction modifiers that save the clutches and plates, which is VERY important in a Chrysler vehicle.  NEVER run Dexron/Mercon, Type F, or any other fluid in a Chrysler vehicle.  Transmission failure will be on your horizon.
     This service can range from $75-$150, depending on the service you select.  I recommend having the best service performed in this case.  The premium service will include a filter change, special cleaners, conditioners, and a reseal of the transmission oil pan, along with the correct fluid for your car.

3.  Engine Flush.
     Pardon my redundancy with this service.  I will put a complete paragraph of what you should do in this case.
     NEVER, NEVER, NEVER, NEVER, NEVER, NEVER, NEVER, NEVER, NEVER, NEVER, NEVER, NEVER, NEVER, NEVER, NEVER, NEVER, NEVER, NEVER, NEVER, NEVER, NEVER, NEVER, NEVER, NEVER, NEVER, NEVER, NEVER, NEVER, NEVER, NEVER, NEVER, NEVER, NEVER, NEVER, NEVER, NEVER, NEVER, NEVER, NEVER, NEVER, NEVER, NEVER, NEVER, NEVER, NEVER, NEVER, NEVER, NEVER, NEVER, NEVER, NEVER, NEVER, NEVER, NEVER, NEVER, NEVER, NEVER, NEVER, NEVER, NEVER, NEVER, NEVER, NEVER, NEVER, NEVER, NEVER, EVER, EVER, EVER, EVER, EVER, EVER, EVER, EVER, EVER, EVER, EVER, EVER, EVER, EVER, EVER, EVER, EVER, EVER, EVER, EVER, EVER, EVER, EVER, EVER, EVER, EVER, EVER, EVER, EVER, EVER, EVER, EVER, get this done.
     If the shop offers you a laundry list of reasons to have an engine flush done, run fast.  This is a horrible way to treat your vehicle.  The engine flush basically washes out the carbon deposits from the lower end of your engine, right where the bearings and seals all live.  When washing away bits of carbon, oil ports and galleys can be plugged up, contaminated with both carbon and the flush agent, and the bearings will be washed out.  After an engine flush, you can typically expect your car to start leaking oil, various gasket failures including head gaskets, intake gaskets, rear main seals (which the engine/transmission has to be removed to repair) and a multitude of other things.
     This service can cost up to $150.00, but consider the going labor rate at your local garage to have your engine replaced.  Do not have this service performed, EVER!

4.  Coolant Flush
     This is a great idea.  Newer vehicles come with a long-life coolant.  Typically this coolant is red or orange in color and will last 10 years or 100k miles.  As coolant is used, the pH lowers, causing it to be corrosive.  The orange coolant, in fact, will crystallize in to small solids that will plug up your radiator and heater core.  Those of us with a history of Chevrolet S-10s will know what it's like when Dex-Cool clogs a heater core in the middle of winter.  Typically, the heater core will clog before the radiator, mostly on GM products.  I recommend having orange coolant flushed every 40-50k miles.  I, in fact, will flush the system completely with  Prestone dry cooling system flush, plenty of water, and convert the system to conventional green antifreeze.  The green stuff will not clog up the system!
     Green antifreeze should be tested at every oil change for pH and effectiveness.  You'll want the antifreeze to withstand about -30 degrees Fahrenheit with about a neutral or slightly alkaline pH.  This will ensure that your coolant will be good for the winter and not harm aluminum, brass, and copper engine components.  If the pH is too low, have it flushed.  If it is neutral and still effective, even if your vehicle has 10 million miles on it, you don't need the service performed.  This service will cost $75-$125.  You can do this at home easily as well!  All you need is antifreeze, a bucket to catch it in, and a garden hose.
     Here's an interesting fact:  Antifreeze will always be effective to cool your vehicle.  The brand, type, and age of the antifreeze has no bearing on its cooling capability.

5.  Power Steering Flush
     This is another service that is middle-of-the-road for me.  If your vehicle has dirty fluid that smells burned, then that is pretty normal.  The flushing of the steering fluid with special conditioners and additives can be a good idea, but typically it is not needed.  If you love your car and want to give it the best, then by all means, have it done.
     If your steering pump is noisy, then give it a shot!  I have seen noisy pumps clear right up with a fluid flush. All of your Ford fans (like me) have heard a noisy, buzzing steering pump a few times in your life.  Flushing the fluid will quiet this significantly.  This service will run around $75.00 at a shop, but it also can be performed at home.

6.  Brake Fluid Flush
     Totally unnecessary as a maintenance item.  Brake fluid, through normal use, will not break down.  If it becomes contaminated with oil or water, it will need to be flushed right away, though.  Heat also breaks down brake fluid.  When brake fluid is heated, it becomes thick like engine oil.  If you have a sticking caliper or a jammed pad, then it is a good idea to have this service performed.  Be forewarned, though: the bleeder valves must be opened to perform this service.  Sometimes, the bleeder valves on calipers and wheel cylinders will be rusty and break off.  Count on replacing a caliper or wheel cylinder if this happens.
     This service can run up to $100, but it can also be done at home.

Keeping your vehicle maintained is all-important to prevent further problems.  Be smart about your maintenance and never buy anything you're leery of right away.  If your car runs fine, then sleep on it and ask questions about the service.  I get a lot of calls about which services to have done to a vehicle, and some of them are outright rubbish.  All of these services can be performed at home with minimal tools, though.  All you will have in to these projects is some time and materials.  Doing it yourself always saves money!  For questions about repairs and vehicle maintenance, or for steps to perform maintenance repairs, email me at DIYfixyourcar@gmail.com

Thursday, September 1, 2011

Repair: 1993 Ford F-150 Starter Motor

After not starting at Menard's, Gene needs a starter repair.


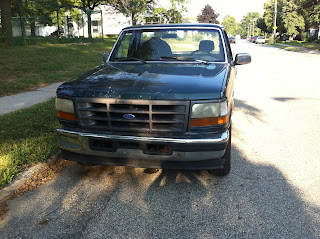
My trusty old Ford pickup failed me at Menard's a couple of weeks ago.  I was in the lumber yard gathering some wood for a home project, I loaded the wood in to the back, went to start the truck, and got only a clicking noise.  Oh no!  My truck won't start!  Luckily, it is a manual transmission and I had battery power, so I rolled it fast enough to engage the clutch and start the engine to drive it home.  No AAA for me this time!  I had a few minutes today, so I decided to get out and fix it.  Let's see what happened!

First, let's explore some of the various components of a starter.  Every starter has a motor body, Bendix, and nose cone.  Most have a solenoid attached.
Components of a starter.  Click for a larger image.
The solenoid is an electromagnetic switch that is basically a relay.  When you turn the key, a wire sends signal to the signal terminal of the solenoid that activates an electromagnet, drawing terminals of a larger switch together.  This is what makes contact to power the starter.  Not only does the solenoid act as a relay, but it is also a mechanical actuator for the Bendix.  When the solenoid is drawn in, it pulls back a fork or plunger attached to the drive gear.  This fulcrum is called the Bendix.  The Bendix also has the drive gear attached.  The drive gear will mesh with the flywheel and turn the engine.  After the motor stops running, the drive gear is pulled back away by spring compression when the solenoid is de-energized.

The nose cone acts as a support for the main shaft of the armature of the starter.  It is machined to close tolerances so it will not contact the flywheel or cause the drive gear to not contact the flywheel gear.  If the nose cone is broken, the starter will make a HORRIBLE sound and will eventually stop working.  The nose cone is where the starter is mounted to the vehicle.

The motor body houses the commutator, armature, brushes, and planetary gears.  It is basically an electric motor.  Nothing exciting there.

To begin the repair, I bench tested the brand-used starter I got from the salvage yard.  When buying used parts for your vehicle, it is of the utmost importance to test the parts that are bench testable before proceeding with any repairs.  Starters, alternators, coils, and pretty much anything electrical is testable out of the vehicle.  We wouldn't want to go through possible hours of labor to install a bad part!

To bench test a starter, simply find your jumper cables in the garage and connect them to the starter as illustrated here:
To bench test, connect the leads of the jumper cables as shown.  Negative goes to the body of the starter (usually a mounting hole works good) while the positive side is clamped to both the signal terminal (small post) and the B+ terminal (large post at the top)
Connect the opposite positive clamp of the jumper cables to the battery positive.  The negative clamp will be your manual switch in this case.  Tap the end of the negative jumper cable to the negative post of the battery.  If everything functions correctly, you should then hear a loud, audible 'click' and the motor should start running freely.  In the case of this starter, the motor sounded labored and loud.  I had gotten a bad part from the salvage yard!  No worries...I fixed it anyway.  We'll go through how that worked.

Time to pull the starter out of the truck.  Locate the negative battery terminal on the battery, loosen it, and remove it from the area of the post.  This will ensure that all power is disconnected from the electrical system of the truck.  The starter wire is constantly powered and there is no switch, so you must disconnect power directly from the battery to make a safe working environment under the vehicle.  If this is not done, the battery could short to ground by touching the terminal of the starter to the frame of the vehicle or other components that may be in the way under the truck.

Locate the starter.  Usually, it is located on the bottom of the engine, bolted toward the transmission.  Some GM products have the starter bolted the other way, directly to the engine block.  It depends on the manufacturer.  Some vehicles, such as a Cadillac DeVille with the Northstar V8, require the entire upper half of the engine to be removed to gain access to the starter.  They're not fun.  Fortunately, this is an old 4.9 (300cid) inline 6-cylinder with a stick transmission.  There's an entire ballroom to work with under there.
Find the starter motor under the vehicle bolted to the transmission.
Remove the bolts that hold the starter in place.  On this particular vehicle, there are only two.  Some have up to four.  be careful to remove all of them, as trying to pry or force the starter out could cause catastrophic transmission damage.  Once the starter is hanging by the power lead (that will not hurt it) then remove the nut for the solenoid signal terminal.  As you will remember, the signal terminal is the smaller of the two that have wires on them.  Next, remove the nut for the B+ terminal (the larger one).  After that is all said and done, your starter is in your hand and ready to be bench tested like the other one.

After bench testing this starter, I found that the solenoid had an open circuit when activated.  A multitude of things could cause this, but the solenoid in a Ford is not serviceable, only replaceable.  To test for a bad solenoid, connect and bench test the starter as before.  If a loud 'click' is heard and nothing happens with the motor, there could be a problem with the motor as well.  If no 'click' is heard, the solenoid is likely bad and can be replaced with good success.  This was a sneaky little devil, so I had to test the motor itself.  On the bottom of the solenoid you will see a terminal that has a braided cable connected to it that leads in to the body of the starter motor.  This is the power lead for the brushes.  We are going to power this terminal directly without the help of the solenoid.

After connecting the cables to the starter and the battery, I found that this starter runs like brand-new...quiet as ever.  The solenoid happens to be bad, though.

I removed the solenoid from one starter and replaced it on to the other one.  This can be achieved by simply removing the power lead to the brushes and the retainer bolts.  It simply slides right out.  After bolting the new solenoid on to my old starter, I am confident that my Frankenstein of a starter will work as designed without a trip back to the salvage yard to exchange the bad one.

Removing the solenoid is no hard task.  Simply remove the wire terminal nut and retainer bolts.  Installation is a reverse of removal.
Bench test the starter again to ensure proper operation.  In this case, the starter works great!  It clicked like it was supposed to, the motor ran quiet, and the Bendix operated perfectly.

Installing the starter back in to the truck is a reverse of removal.  Connect the B+ lead, then the signal lead, then bolt it in to place.  Be sure the wires are far away from hot exhaust components, as this could melt through the insulation and cause a fire.  Don't try to be He-Man with the bolts, either.  Tighten them up tight, but not super tight.  If a hole becomes stripped, that is a difficult problem to solve.

I put the starter back in the truck and it started right up!  My trusty pickup lives again!
Enjoy your dirty-handed test drive.
For any questions about automotive repair or components, feel free to email me at DIYfixyourcar@gmail.com.

Thursday, August 25, 2011

Testing and Diagnosis: 2003 Chevrolet Express A/C issue.

Diagnosing the problem is usually 75% of the hassle with automotive repair.  A seemingly simple problem can snowball in to a weekend of trial and error, only to find that the hundreds of dollars worth of parts you've bought failed to fix any problem with your vehicle.  Steps must be followed to correctly diagnose any issue with your vehicle.  Today we will look at a 2003 Chevrolet Express van.  The air conditioner doesn't function.
First thing, when an air conditioner doesn't work in a vehicle, we must do a simple visual inspection to ensure that everything is present and accounted for.  Sometimes, the simplest thing can make the air conditioner not function.  Belts, electrical connections, and lines and hoses must all be verified present.  Ensure that the condenser has not sustained major damage.

Next, start the vehicle and turn the air conditioner on.  See the compressor?  If the clutch fails to engage to turn the compressor itself, the Freon in the system has no way of moving through the system.  Remember our previous post about how A/C works in your vehicle?  Most likely, if your A/C doesn't work the compressor is not turning at all, only free wheeling on the pulley.

If the compressor clutch engages and turns the compressor constantly while the A/C is on, then you most likely have low Freon levels, but high pressure.  R134A refrigerant is a smaller molecule than air and will escape over time, leaving only hot air and residual pressures in the system.  The clutch will engage, but the system has no refrigerant to compress and turn in to liquid.  Evacuate the refrigerant and recharge the system at this point and everything will function normally.

In the case of this Express, however, the Freon levels were verified good through a vehicle history and testing pressure.  The system was recharged only a year ago and the clutch was not engaging the compressor.

We connect the lines of the A/C gauges to the high and low ports of the system to test pressure.  The low pressure port on this particular vehicle is located on the receiver/dryer.  The low side port can always be identified in an R134A system as being smaller than the other.
The high pressure port is located on the firewall
on a high-pressure line.

The low pressure port is located just to the right of the
red positive battery terminal on the side of the receiver/dryer


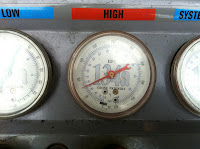
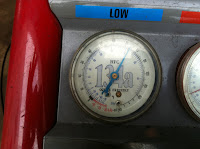
After connecting the gauge set, we take pressure readings from the system.  Here, we can see that we have 74psi of pressure on both the high and low pressure side.  This is totally normal and within specification for this vehicle.  You'll want your pressure to be between 60-80psi with the system not running.  Also, check to see if pressures are equal between the high and low pressure sides.  Any variance in this will indicate a blockage in the system from a pinched line or hose, a plugged orifice tube, or some other issue.  Seeing as how my pressures are normal, the system should work!  At this point, we have to look at an electrical problem.
High pressure side at 74psi
Low pressure side at 74psi


The first thing to check when you suspect an electrical problem is all of the connections at the pressure switches and compressor.  Often times, I have seen a plug that someone has inadvertently unplugged or has forgotten to replace after a repair.  If everything is plugged in and working, the dangerous part comes.

Remember watching Norm Abrams on the New Yankee Workshop?  He would always pause before using a power tool to talk about shop safety.  Here's our speech:  
We at DIY are only concerned about your safety.  If you feel at ALL uncomfortable working around a running engine, then stop.  DO NOT attempt any repair or diagnosis on a running engine if you do not feel COMPLETELY comfortable working around moving parts that can possibly injure you.  
With that out of the way, let's test the compressor clutch coil for battery power.

Locate the plug for the compressor clutch.  It is always located on the back of the compressor pulley, and on GM products it is a flat plug with two terminals.  One is chassis ground and the other is battery voltage signal. If everything is working correctly on the pressure switch side and the other checks the vehicle's system makes to ensure proper pressure, we should have battery voltage at this connection.

Pin the terminals in the connector to test for voltage.
After pinning the terminals in the connector with your voltage meter or test light, start the engine and turn the A/C on.  Ah ha!  We have battery voltage at this terminal.  This means that the system is functioning properly right down to the compressor clutch coil.  With all systems functioning, there is no reason other than a bad compressor coil for this system to be inoperative.  

After replacing the compressor clutch coil, we now have functioning air conditioning and a happy customer!

For any questions about testing or diagnosing a problem with your vehicle, feel free to email us at DIYfixyourcar@gmail.com

Wednesday, August 17, 2011

Welcome!

Welcome to DIY auto repair.  Here we will explain in detail how to repair your car yourself.  No job is too big or too small.  I will provide the information, the specifications, and information on the correct tools and procedures necessary to repair your own automobile.  I am an automotive technician with over 15 years of experience in the field, and I would like to give back to the community.  I think everyone should be able to fix their own car for free!

If you have any questions about automotive repair or car questions in general, feel free to drop me a line at diyfixyourcar@gmail.com and I will share your question or comments with everyone.

Thank you, and happy wrenching!